Grymn Powered Armour, Part 5
This is a digital sculpt on behalf of Hasslefree Miniatures, in the UK.
I feel pretty confident, now, that the Second Wave of detailing is done.
Everything up until now has been about basic shapes, and moderate levels of detailing.
After this, I start polishing and cleaning up the little things. Things may not change radically, but some subtle improvements will come to be.
So, here's the index of how this build has come along so far. Click on the numbers to see the separate blog entries...
Part One. Part Two. Part Three. Part Four.
So, starting up where I left off in Part Four, I take the rail gun, and add a cylindrical ammunition drum to the top rear surface.
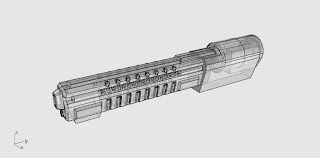 The drum is buried within the receiver section's bulk-out, though...

 So I extrude a section, and cut it away, to expose more of the drum.
 Here's how that looks rendered.
 A test-fit with the armour's body look right.
 Now, I have to improve the bulk-out of the backpack/power plant.
 I join the two "scoops" with a bridge section that is an extrusion.
 I want subducted grilles, so I carve out pockets for them.
 One of my techniques for making grilles is to stack a series of cylinders, all slightly overlapping...
 Then use the Scale1D command to "crunch" them slightly, to give the impression of louvers. Hard angles at this size will either be obscured, or rip molds. I want this grill to stand out, and not tear the dickens out of production molds.

 I BooleanUnion the compressed cylinders into the scoops, and mirror the object to both sides.


 I now need a means of showing a tank that is embedded into the backpack. A cylinder is created, then enough of the bulk-out is removed to show it off.
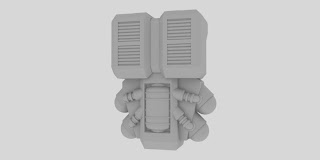
 I then create a system of conduits and valving that connect the tank to the four "bulbs" on the sides of the backpack.
 Not bad. This rendered shot shows that the backpack is visible, but not overpowering the rest of the sculpt.

 I then form a socket in the railgun, as well as fabricate a missile launcher. They attach to the corners of the "scoops" of the backpack. They can be mounted, or left off, with no empty gaps on the backpack.
 The "Second Wave" of detailing is now done.
Have a good Labor Day.
Best,
JBR
I feel pretty confident, now, that the Second Wave of detailing is done.
Everything up until now has been about basic shapes, and moderate levels of detailing.
After this, I start polishing and cleaning up the little things. Things may not change radically, but some subtle improvements will come to be.
So, here's the index of how this build has come along so far. Click on the numbers to see the separate blog entries...
Part One. Part Two. Part Three. Part Four.
So, starting up where I left off in Part Four, I take the rail gun, and add a cylindrical ammunition drum to the top rear surface.


Have a good Labor Day.
Best,
JBR


Comments
It would be great for two reasons:
1. It would make the suits usable for the 15mm crowd.
2. It would make things like the pack available to the 28mm crowd as options.
Both would be good for the range.
I assume that you have a 'hard copy' of a Powered armour suit and one of each arm? If you make the shoulders mimic them, they could be directly transferable as 28mm 'bionic' arms as well as 15mm landmate arms.
This stuff is great (you may have guessed I thought that) and it is what I have been saying before... the different sizes can be transposed with a few little tweaks. Take the walkers from Critical mass games. With a simple cover for the top of the body you could make them 28mm scout walkers.
Keep up the great work :)
Kev is aware of this project. I'll have these printed out, and send them to him for molding. Hopefully, they won't be a nightmare like the CAD guns I did for him and Sally.
I agree with you on both points. I was also going to suggest to him that these could be cybernetic supplemental weapons in 28mm, or use the armours as 15mm micromechs. Perhaps he will be able to convert the already-existing arms to fit this new shoulder (it would just entail grafting a 1/8" ball to the elbow).
Everyone wins!
Best,
JBR