Grymn Powered Armour, Part 3
Here's Part One and Part Two, respectively.
Here's Part Three of digitally reworking an already-amazing 28mm Grymn Powered Armor into a 15mm Micromecha, Landmate, SciFi Dwarf Dreadnought, or Assault Cyborg (take your pick).
This update is more of a tutorial in how I do some speedwork on what I consider a "second wave" of detailing. The basic shapes have been figured out, now it's time to start showing how things fit together. No fine detailing, per se, but we're getting to that point.
Chopping, slashing, cutting, and welding with wild digital abandon.
OK, maybe that's a bit of an overstatement, but let's go ahead anyway.
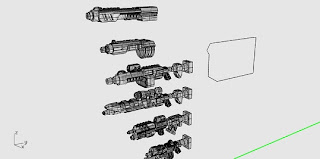
We start with the digital files of the 28mm CAD weapons I did for Hasslefree Miniatures. I've winnowed the candidates to this half-dozen. I work normally in "Ghost" mode, so please pardon the see-through shots. Ghost mode gives me a better feel for the piece being worked, without having to constantly turn it in circles to get an overall look at it.
Rendered shots are for clients or the public, usually, and give the objects being shown a less transparent skin.
I work in Rhino3d, just so you know.
 Those squares attached to their buttstocks are sprue points. We're looking to get rid of everything other than the barrels, since a hardpoint-mounted weapon doesn't necessarily need a trigger, sights, or detachable magazine like a man-operated weapon does.
 I select the "payload rifle" first. Here, I extrude a number of rectangular blocks to intersect with the parts I want removed.
 I then use the command "BooleanDifference" to remove the blocks from my selected piece.
 Another means of removing extra material is to form a closed curve around the undesired parts.


 You then Extrude that closed curve into a solid, and BooleanDifference the material away. The curve is left behind after the process, but just select it and delete it.


 I continue this process for the other four weapons, leaving only what I want.
 Let's take that Bullpup rifle with the underbarrel grenade launcher. Pretty crude, up close, but we'll just consider this our result after the "first wave" initial blockout has been done.
I form two spheres in the muzzles of the barrels, and BooleanDifference them away, to create the impression of a barrel.
 I run a command called ChamferEdge along a few rougher edges. This smooths out the blocky look.
 The details of the upper handguard have to go. I pull and delete the surface they're attached to (ExtractSrf is the command). They are now floating in midair, and the object as a whole is now an open polysurface, which won't prototype.
 I delete the floating detail hashmarks...
 ...and perform the Cap commmand, which seals all open planar surfaces. This won't work on curved surfaces, just slabby ones. The old details are gone, and the object is now prototypeable again.
 I ChamferEdge the small block of material that is between the two barrels.
 I want some slots in that upper barrel's muzzle device. So, I make one tapered shape...
 And perform a PolarArray command, using the center of the barrel as the radial point.
 I BooleanDifference the shapes away, and their impressions "carve" grill marks into the muzzle, making it a flash-hider like on modern rifles.
 I put some rounded grooves into the top of the reformed handguard, and use a command called FiletEdge to round off the sharp edges created.
 The business end of the combination weapon is basically where I want it for Second Wave detailing. Now to make it a semi-functioning system, complete with ammunition storage, mounting points, and other semi-real-world detailing.
Using the command MoveFace, I select the back end of the barrels, and extend them to a length that looks about right.
 I create a large, multi-edged block to act as the rear of the weapon. This is where the loading and feeding of ammunition will occur. I also want two visible sources of ammunition for the two barrels. I start with the larger, bulkier container for the "grenade launcher" lower barrel.
The pink ball is the attachment point stand-in. For you open-source types, a 1/8" ball (.125 inches or 3.175mm) bearing would perform the same function, if you were making your own weapons and attachments.

 I form a closed curve, extrude it into a shape, and remove its shape from the receiver block. This will be a "pocket" that the real magazine sits in.


 I then create a line, extrude it, and chamfer the edges of it, so it fits into the previously-created pocket. I want the channels and gutters formed between the two shapes to be deep enough to gather paint and washes, but not so deep that they rip out molds.
 I make anothe pair of pockets, one on each side, for the "rifle" barrels' magazines.
 These will be twin cylindrical magazines, like a Calico or Bizon type of helical feed device.
 A little bit of extra detailing. Reinforcement ridges on the magazines. A shot counter for the grenade launcher. Retention devices to hold the magazines in place. Tiny stuff like that.
 Here's a rendered shot of the Second Wave-detailed combi-weapon.

 "Arms-length" perspective shots of the paired combination weapons on the Grymn hull, with a 15mm-scale Waldo for reference.
 A closer look at the same.
More to come.
Best,
JBR
Here's Part Three of digitally reworking an already-amazing 28mm Grymn Powered Armor into a 15mm Micromecha, Landmate, SciFi Dwarf Dreadnought, or Assault Cyborg (take your pick).
This update is more of a tutorial in how I do some speedwork on what I consider a "second wave" of detailing. The basic shapes have been figured out, now it's time to start showing how things fit together. No fine detailing, per se, but we're getting to that point.
Chopping, slashing, cutting, and welding with wild digital abandon.
OK, maybe that's a bit of an overstatement, but let's go ahead anyway.
We start with the digital files of the 28mm CAD weapons I did for Hasslefree Miniatures. I've winnowed the candidates to this half-dozen. I work normally in "Ghost" mode, so please pardon the see-through shots. Ghost mode gives me a better feel for the piece being worked, without having to constantly turn it in circles to get an overall look at it.
Rendered shots are for clients or the public, usually, and give the objects being shown a less transparent skin.
I work in Rhino3d, just so you know.


I form two spheres in the muzzles of the barrels, and BooleanDifference them away, to create the impression of a barrel.


Using the command MoveFace, I select the back end of the barrels, and extend them to a length that looks about right.

The pink ball is the attachment point stand-in. For you open-source types, a 1/8" ball (.125 inches or 3.175mm) bearing would perform the same function, if you were making your own weapons and attachments.


More to come.
Best,
JBR


Comments
When I compare my stuff to yours or Mondragon's work, though, I feel like a preschooler with fingerpaints.
;)
Best,
JBR
Heh. ;)
Best,
JBR
Having some knowledge and your explanations at how you work make it seem so easy! When I am well aware that it is not so. Thanks for the insights tough.
The nice thing about Rhino is that if I can do it, anyone can. It just takes time. And caffeine.
Best,
JBR