Comfy Chair SpiderMech Workup, Part 1
I've been knocking a lot of time out in the digital sculpting chair, so I thought I'd get some manual time in to stave off burnout.
I received a gracious shipment of 4 SpiderMechs from Comfy Chair Games a few months ago (Thanks Bob), and decided to put one together for Halloween. The SpiderMech (or MechSpider, if you're so inclined...both are apt descriptions) is one of my favorite sculpts, and I'm delighted to have a foursome of them to put together.
The kids were painting pumpkins, and I set up shop on the back of a 5x8 notebook.

 Here's the parts layout. I like the large weapons that come with the SpiderMech from the factory, but decided I wanted something a bit smaller. So I dove into my bitz box.
Here's the parts list...
1 SpiderMech body with 8 legs
1 set of suppressive head gatlings that mount over the sensor module
1 arm from a Reaper CAV Spectre (I think).
1 medium gatling from the Rebel HAMR Fire Support Sprue
1 triple missile bit from the same HAMR Sprue
2 top deck adapters from two HAMR Fire Support Sprues
 I like Magic Sculpt. No paid advert, here, just letting you know about it. Comes in 5 pound tubs, cheap as hell, and vulcanizes. Smooths with water, too, but don't lick your tools. It doesn't taste too good. Ask me how I know.
I like the Black type, though it comes in different colors. I get it from a taxidermy supply store.
 I start construction by twisting the missile launcher forearm off the CAV bit. I keep the upper arm, since it will be the body for the turret I have planned. The launcher goes back in the box.
 Here are all the turret components, and the MS, pre-mixed.
 MS mixed up, and some Critical Mass figs brought in for scale reference.
 I take two small lumps of putty, and squish the two top deck adapters against the sides of the turret main body. Putty fills in the gaps and holds everything together.
 The excess is trimmed off. Not bad.
 The excess scrapings are balled up, and used to fill the top socket of the SpiderMech's body.
 I use the turret's peg that would normally glue into the torso of a CAV to create its own socket in the putty.
 I use a trick from the first time I put together the prototyped master model of the SpiderMech. Playdo! It's an easy fixture that really helps keep everything in place while the glue sets.
 I lay down two outrigger strips to keep the tips of the legs from slipping around.
 The legs go on with a little trouble, but the playdo helps stabilize things.
 I didn't like the gap at the back of the turret, so I used the last of the MS to fill it in. A descending cowl and a pair of grills are sculpted into the putty.
 Well, here's everything so far. Stay tuned for assembly and paint.
Best,
JBR
I received a gracious shipment of 4 SpiderMechs from Comfy Chair Games a few months ago (Thanks Bob), and decided to put one together for Halloween. The SpiderMech (or MechSpider, if you're so inclined...both are apt descriptions) is one of my favorite sculpts, and I'm delighted to have a foursome of them to put together.
The kids were painting pumpkins, and I set up shop on the back of a 5x8 notebook.

 Here's the parts layout. I like the large weapons that come with the SpiderMech from the factory, but decided I wanted something a bit smaller. So I dove into my bitz box.
Here's the parts list...
1 SpiderMech body with 8 legs
1 set of suppressive head gatlings that mount over the sensor module
1 arm from a Reaper CAV Spectre (I think).
1 medium gatling from the Rebel HAMR Fire Support Sprue
1 triple missile bit from the same HAMR Sprue
2 top deck adapters from two HAMR Fire Support Sprues
 I like Magic Sculpt. No paid advert, here, just letting you know about it. Comes in 5 pound tubs, cheap as hell, and vulcanizes. Smooths with water, too, but don't lick your tools. It doesn't taste too good. Ask me how I know.
I like the Black type, though it comes in different colors. I get it from a taxidermy supply store.
 I start construction by twisting the missile launcher forearm off the CAV bit. I keep the upper arm, since it will be the body for the turret I have planned. The launcher goes back in the box.
 Here are all the turret components, and the MS, pre-mixed.
 MS mixed up, and some Critical Mass figs brought in for scale reference.
 I take two small lumps of putty, and squish the two top deck adapters against the sides of the turret main body. Putty fills in the gaps and holds everything together.
 The excess is trimmed off. Not bad.
 The excess scrapings are balled up, and used to fill the top socket of the SpiderMech's body.
 I use the turret's peg that would normally glue into the torso of a CAV to create its own socket in the putty.
 I use a trick from the first time I put together the prototyped master model of the SpiderMech. Playdo! It's an easy fixture that really helps keep everything in place while the glue sets.
 I lay down two outrigger strips to keep the tips of the legs from slipping around.
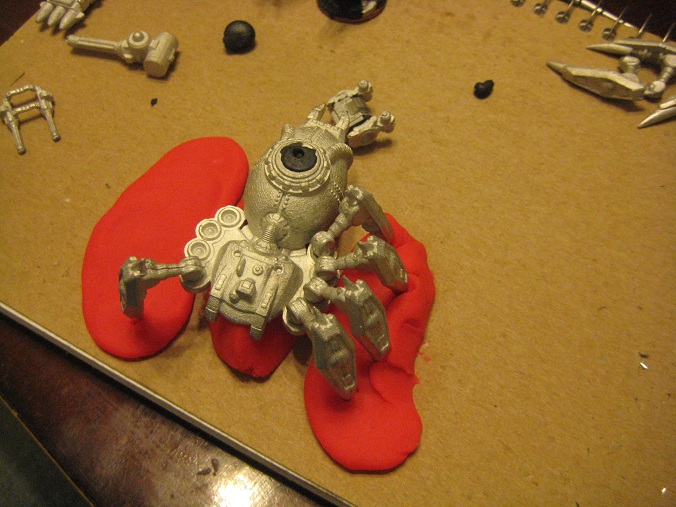 The legs go on with a little trouble, but the playdo helps stabilize things.
 I didn't like the gap at the back of the turret, so I used the last of the MS to fill it in. A descending cowl and a pair of grills are sculpted into the putty.
 Well, here's everything so far. Stay tuned for assembly and paint.
Best,
JBR


Comments
In regards to Magic Sculpt, I agree with you 100%, it is a GREAT product. My favorite part of working with it is that it will slurry with water just like clay and dries like hard plastic.
Looking forward to seeing how you project turns out.
Jeff
I've made an arrow rest for my son's bow, made custom knife handles, and patched and fixed numerous objects around the house with Magic Sculpt, as well as made epoxy billets when I had my milling machine. It machines up nice, too. Real handy, universal stuff, and you can't beat the price.
Best,
JBR
As I am not to careful the the contents of the pigments I use to color Magic Sculpt I have broken the spit method of smoothing...