Critical Mass Games Guardsman Assault Mecha Assembly Guide
The Ygs Guardsman from Critical Mass Games is a custom model in and of itself.
For £10, you get a hell of a lot of options.
I'll show you why below.
First, one possible completed model, direct from the factory...
Why does it look like that?
Because I think mecha should be based on the physiology of the races that made them. The Ygs are shaped like this, their mecha should be as well.
The Ygs are an intriguing alien race that add a lot of flavor to Critical Mass Games' little universe.
I am glad they exist.
On to the assembly guide...
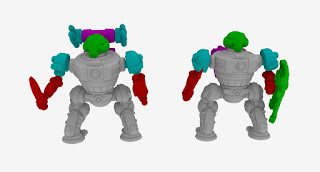
Here's what the colours represent (UK spelling, of course, since CMG is a UK company). They are to visually sort out parts, based on attachment points.
First, attach the main hull to the legs.
The head attaches to the top of the main hull.
OPTION ONE: If you want a jump assault mecha, use the included jet pack. A gift to the Ygs from the Astagar. Or, perhaps, stolen from the Snakes when they weren't looking. ;)
Ygs shoulders attach to the side sockets in the main hull.
If you wish, the Ygs shield attaches to grooves in a Ygs forearm. This particular arm has nothing in its grasp by design. Left or right versions are available.
A Ygs sword arm and the assembled shield arm can then be attached via the 1/8" ball/socket connections on the shoulders.
That's one possible option with the Guardsman kit.
OPTION TWO, you can attach the weapons backpack to the assembled head and hull, much like a Gunman Assault Mecha.
Ygs Mortar Bombs attach to the sides of the backpack.
Ygs Shoulders are added.
Your choice of the included weaponry is then attached at the 1/8" elbow sockets.
He's now ready for business.
Here are the two assembly guide options, side by side.
Here is a recreation of the factory picture.
Parts may vary in your purchase when it arrives. The nice thing about the Guardsman is that there are so many options available to you.
Even more, if you buy a 3-unit platoon of them.
If there are any other customizations you want, the CMG Mecha Workshop has you covered.
Speaking of which, Craig and Dale worked up a neat little PDF document, showing pictures of the bits from the Mecha Workshop in pewter and resin, alongside a ruler and grid for reference. Click here to download the document.
Best,
JBR


Comments